Project Configuration
DataWeb integrates seamlessly into a ASP.NET Core project, so you can create a blank web app, add NuGet packages, and manually configure your code.
However, there is a much faster way to achieve the same result: just install and use the dedicated dotnet template .
This model is updated with each new release and allows you to have a ASP.NET Core site with active DataWeb in a few minutes.
However, there is a much faster way to achieve the same result: just install and use the dedicated dotnet template .
This model is updated with each new release and allows you to have a ASP.NET Core site with active DataWeb in a few minutes.
Installing the dotnet DataWebApp template
The DataWebApp template contains a basic Core ASP.NET project with everything you need to start developing with DataWeb right away.
From the command line, install the latest version from its NuGet package:
dotnet new install "\\MyNuGetPath\DataWeb.Web.TemplateApp.11.0.0.nupkg"If you receive an error because an older version of the template is already present, you can remove it with this command:
dotnet new uninstall DataWeb.TemplateAppWhile with this command you verify that DataWebApp is part of the installed templates:
dotnet new listProject and solution creation
This section tells you how to create a new ASP.NET Core project with DataWeb from the command line and associate it with a solution.
Navigate to the folder where you want to create the project and run:
dotnet new datawebapp -o MyAppwhere MyApp is the name of the project. Note that this name will also be used for the code namespace.
Now proceed with the creation of the solution that will contain your project:
dotnet new sln -n MyAppand finally associate the project with the solution:
dotnet sln MyApp.sln add MyApp\MyApp.csprojThe ASP.NET Core project with DataWeb is ready!
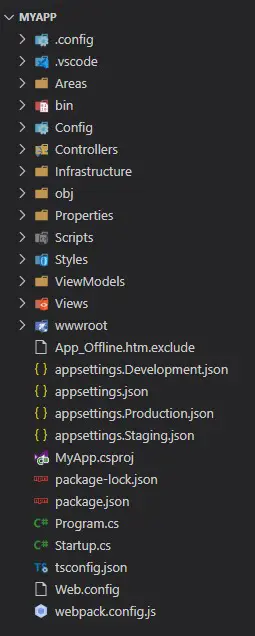
Open it in Visual Studio Code (or Visual Studio if you prefer). You'll find a structure like this:

Start the project with F5 and, after the short compilation, you will find the welcome page on https://localhost:5001 . Hurrah!

Project Settings
The template sets up the appsettings.json configuration file with a set of standard settings.
It's time to customize the values and configure the database connection string (this section doesn't go into detail about creating a database on SQL Server).
Creating the Data Structure
The last step is to create the data structure in the SQL Server database dedicated to the project.
The app already includes the DataWeb.DevOps.SqlServer package dedicated to the installation and updating of the database.
In particular, the DevOpsController controller contains the code necessary to perform the database setup:
using System.Threading.Tasks;
using Microsoft.AspNetCore.Mvc;
using DataWeb.DevOps.SqlServer;

namespace DataWeb.Web.TemplateApp.Controllers
{
    public class DevOpsController(InstallService installService) : Controller
    {
        private readonly InstallService installService = installService;

        [Route("devops/install")]
        public async Task<IActionResult> Install()
        {
            await installService.InstallAsync(new InstallService.InstallOptions()
            {
                DeveloperUserName = "MyUserName",
                DeveloperEmail = "myemail@xtra.it",
                DeveloperPassword = "really-strong-password"
            });

            return Content("Install completed");
        }
    }
}
We just have to run the associated endpoint https://localhost:5001/devops/install and wait for the task to complete.
When Install completed appears, the data structure creation is complete and we can start using DataWeb at https://localhost:5001/dataweb. Well done!
When Install completed appears, the data structure creation is complete and we can start using DataWeb at https://localhost:5001/dataweb. Well done!